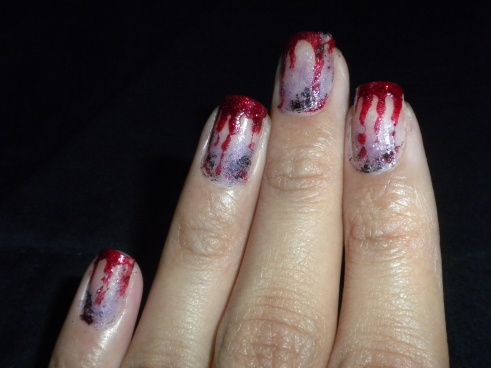
Bloody Halloween Nails

This design seems easy to me since its more of a care free design, however it does take a tad bit longer to do.

What you need:

  • Red, black & purple (or blue) nail polish
  • Toothpick or dotting tool
  • Makeup sponge
  • Qtips (for clean up)

First off apply a base coat.
After your base is dry take your red polish right out the bottle (without taking off excess polish) and wipe it onto the edge of your nail.

As you can see there is quite a bit on my nail, this is good since we are going for the dripping blood effect. Hold your hand up to allow it to drip down (will only work if polish is not thick) if it doesn’t drip naturally (which was may case) take your dotting tool and just slightly touch the top of the polish and pull down to form the drips. Do NOT press down and drag, it will give a harder effect that we don’t want. Dab off excess polish on the edges of your nail.
Now apply some purple or blue polish to a make up sponge and lightly dab the tip of your nail going down to the end. It should look like the image below.

It looks faint right now but later we add more to the top. Its time for your black polish, apply a very small amount to the edge of your makeup sponge and dab it onto the top corners of your nail. We would eventually end up with a bruised effect.

To make the black less prominent you can go back in with the purple. Below is how I averaged out the black and purple on one makeup sponge.

More purple over the black and clean up with a Qtip.

And that’s it! We’re all done. Hope you enjoyed. Be on the look out for more Halloween nail art. 🙂

Sliver Swish

I really didn’t know what to call this quick design, so I took the cheesy way out. El oh el.

What you need:

  • nail art fan brush
  • nail polish D:
  • remover (for clean up)

Step 1: Apply a base coat and paint you nails in the desired colour, in this case it was purple.

Step 2. Add polish to the ends of the brush. Place it on the corner of your nail and make a quick swipe across.

A quick clean up, add a top coat and you’re done!

Enjoy! :3

Mermaid Scales

I saw a picture of a mermaid over the weekend and it inspired me to make mermaid nail art.

The colours I decided on using, simply put was a green, variations of blue and purple.
To begin, apply a base coat followed by a light green nail polish.

(sorry for low quality photos my camera died)

NK Nail Enamel. 087 Green

You don’t really need more than one coat since we are going to do a gradient effect. Just make sure that the top looks pretty.
Next  apply a blue polish to a make up sponge and dab it onto your nail, starting from the bottom go up.

Sinful Colors – Gorgeous

You could just use one blue colour and build up on it, but I decided to be difficult and use 3 😉

InColor by Jordana – Kiss and Teal

annnnnd more blue

Sinful Colors – Bottom of the Ocean

(Qtip dipped in nail polish remover necessary)
but I Obviously don’t take my own advice

Finish the gradient with a purple polish.

Sinful Colors – I LOVE YOU (such an appropriate name for purple polish ^.^)

At this point you would want to apply a glitter polish of some sort. I used an evanescent coloured glitter polish with tiny flakes but I would have rather used one with small to large flakes, since the world is in recession and we got no superheros to save you from nail polish debt you gotta use what you have.

(And yes that one white speck on my 1st nail is the glitter catching light) I swear it shows in real life! Thats it…. I’m going to create a nail polish super hero and make him/her my mascot.

Sinful Colors – Pearl Harbor

Mermaids have scales right? I used a dark blue here (yeah thats not black)
I didn’t want to put the scales on all of my nails because the gradient looked so pretty…
To get this look take a toothpick or nail art brush and make little U’s on the entire nail.

Sinful Colors – See you soon

Sometimes I wish that nail polish names were more logical :/
After having done that I applied another coat of my glitter polish and then a top coat.

A quick clean up and wa-la!
Done. Enjoy :3

Yay!